One of the strongest tools that we have access to in the Transformers TCG is the sideboard. That’s right, I said it. The. SIDEBOARD. The problem that I constantly see is that players are not using this tool to its utmost potential. Don’t think of the sideboard as 10 battle cards and another character. Instead, view your sideboard as a tactical weapon that will allow you to turn unfavorable matchups on their head as well as bolster you existing strategies elsewhere. In order to be able to fully harness this power we need to discuss a few things.
What character should I use?
What battle cards are good?
Which are bad?
How effective are these cards in each matchup?
DODGE?
You can transform the entire dichotomy of your deck with the addition of a single character. By drastically altering the strategy of your original lineup, you will be able to capitalize on previously weak areas. You must always consider the addition of star cards when taking this approach as well. Let’s go through two examples.


Being able to transform your team from a 3-wide deck into a 2-character deck can carry a multitude of bonuses. Obviously, your characters are giant, both in health and attack stats. You also must consider the turn sequencing. This strategy is at its most potent against various 4 and 5 wide decks. Those decks operate by trying to generate the most value from being able to see the greatest number of cards by getting to take more turns based on their lineup. While the wider characters are weaker in overall stats, it’s the multiple actions/upgrades that make them potent. By switching into a 2-character variant, you can completely shut that resource off. Going first, you will limit their maximum number of cards to a total of three. THREE! Those decks cannot operate effectively on such a low action economy. While you are attacking for 7 and 8 (plus battle cards), they are returning fire with 3 and 4 attack and not all the characters get the benefit of battle cards. Not only do you limit their action economy, but you also get to dictate the pace of play by being able to select targets both on your opening attack as well as the first full attack after the re-stand!
The 2 tall configurations also allow for some deceptively powerful cards to shine:

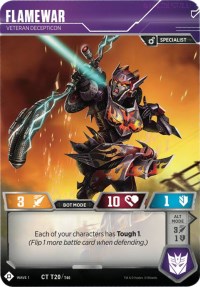
Photon Bomb has always been a scary and dangerous card. It’s incredibly difficult to justify the inclusion in your maindeck when you are a 3-wide deck whose sole goal is survival. Against Aerialbots (and other combiner decks) the card is ten damage to the opponent if played in the first turn or two. Sounds excellent? It is, but you cannot afford to take six damage yourself. I’m most certainly not a player who is afraid to crack some cybertronian eggs to scramble my opponents. The difference is the game plan that lies at the center of Superion. Do small amounts of damage with each action or attack while restricting as much damage as possible to themselves. Then, combine and optimally shoot someone and attack another character taking two out in one turn.
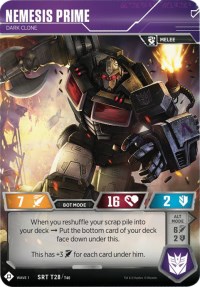
When you are in a tall variant, Photon Bomb only does four to your team. Yes, its only two less damage, but remember, our dichotomy has changed. They no longer are going to get as many actions that deal guaranteed damage while facing down a larger health pool per character. The dream is to attack with Optimus Prime first and flip a Bomb. That’s 18 damage without playing a card! Then your next turn is a flip and replay the Bomb for another 8-10. I also need to mention that this synergistically has Nemesis set up for an Energon Axe and a 9 point attack (2 guaranteed). This sideboard plan was able to make an almost unwinnable matchup into one that is close to unlosable just from our sideboard.
The next example showcases some more subtle character interactions for a specific matchup:

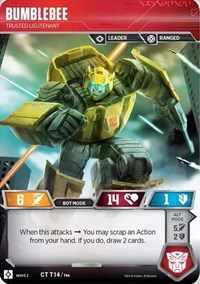
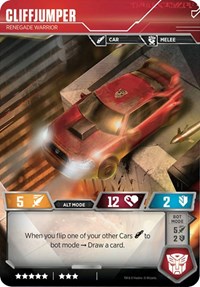
Many people are complaining about not being able to fight against Shockwave. Well I’m here to tell you that this lineup DEMOLISHES the Major. The reason for starting Wheeljack is because you need to find your untap effects (Start Your Engines, Ready for Action, Turbo Boosters) as quickly as possible. Being able to upgrade a character while on the hunt for an untapping action is incredibly crucial against most decks. Trusted Lieutenant still does most of the legwork wherever he is utilized, but the additional card filtering is also just as important. Understand that Cliffjumper also digs for a card, but he does so at the cost of a flip (and it is a real cost that players continue to ignore). Having to flip a character to draw a card can severely hamper the rest of your turn. It shuts off Turbo Boosters as an option (as Bee will not be in car mode) and Start Your Engines doesn’t allow for Bee to attack again and draw more cards.
Against Shockwave, you are not pressured as fast. Here, the additional cards that Cliffjumper provides allow you to have a buffer to discard to UFOs and normal flips. Most lists are also slanted towards blue, which is glorious for the cars player. The only character that can effectively take out one of your team is Shockwave himself, and he needs to be properly geared up. You will also get more attacks throughout the course of the game than he will because of your untaps. If you go first, you will have seven cards in your hand on the first turn that you can play anything.
Draw at the start of the game {4}
One from Cliffjumper (Bee Flip) {5}
Attack with Bee (Net one card) {6}
Draw for your second turn {7}
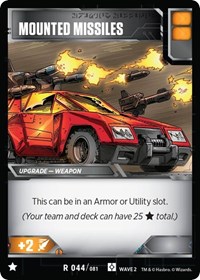
Being able to search for your untap effects while protecting cards you want to utilize during later turns, Cliffjumper gives you access to a star card. Mounted Missiles is perfect here. Not only is it an efficient weapon that does not need to override an Energon Axe or Erratic Lightning, it also gives us access to seven double oranges. This does not completely make up for the loss of Wheeljack’s Bold 3, but it is certainly a welcome addition to the arsenal.
This subtle change to your team’s lineup still allows you to execute your original game plan of trying to generate additional attack steps with an orange skewed deck while simultaneously giving your hand a buffer. Shockwave pressures your hand, as does Wheeljack. When they are both in play, there is no real way of protecting cards for future turns. Thus, Cliffjumper comes in to lend a hand to your hand.
Seems like an awful lot to consider for just one card. Buckle up, Buttercup. We have battle cards to go through, and you have access to 10…
I’ve seen so many wasted slots in sideboards since Origins. Cards that only help in favorable matches and feel like “win more” options. Cards that seem out of place within their archetype. Its easy to see why they were included but using a playset of cards to combat an opposing single card isn’t a great way to get ahead. Especially when the “problem card” isn’t even the root of why the matchup is unfavorable to begin with. Let’s dive into a few examples
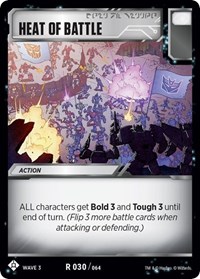
Everyone can recognize the power of heavy orange decks and how Bold is able to stack up incredible amounts of damage with each attack. So why wouldn’t a card that gives your entire team a Supercharge be good for a turn? There is the obvious downside of giving the defender the Tough 3 when you run up against a blue decks. That’s the main reason it shows up in sideboards. Being able to “break” the symmetrical effect when you know that your opponent’s deck will not be able to benefit from the additional defensive flips the card grants is unquestionably powerful. It’s also used in decks that can generate additional attackers through untap effects (cars) or lineups that will naturally have an additional attacker (4 and 5 wide orange decks). Being able to get Bold 3 on two of your attackers with a single card seems like too much value to pass up? The core problem with this line of thought is that the card is just unnecessary in those matchups. If you are a wider orange deck (which gives you the additional attacker) against larger 3 wide orange strategies, you do not need to play Heat of Battle. All it does is solidify your matchup dominance and take up space in your sideboard. The same is true in car lineups. If you are doing the “car thing” and regularly untapping your characters to generate at least one additional attack, you are already winning the matchup. In order to effectively have a large wheel turn, you must use one of your untap effects to leverage the damage. Unless that card is Turbo Boosters, you will not be able to play another action (outside of corner cases with Trusted Lieutenant and Brainstorm shenanigans).
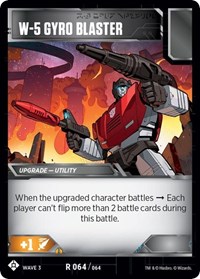
This upgrade was my pick for strongest battle card in Siege I and I still think that people are both underutilizing as well as misunderstanding where it really shines. I can understand not wanting yet another blank pip in your battle deck for the first game. The meager attack boost is also nothing to get overly excited about. Being able to single-handedly shut down characters that have an entire strategy centered around bold (Metroplex) is exciting. There is also the fringe benefit of negating the strong effects from General Optimus and Flamewar type characters. Being able to completely shut down your opponent’s offensive capabilities when their deck is based around Bold is amazing. The problem has always been being able to effectively funnel each attacker into your character who is upgrade with Gyro Blaster. You are likely able to shut down one retaliatory attack but after the initial hit, other characters will be available to be attacked and Bold cards will be able to do their thing once again. You must contort your deck to either contain a full set of Gyros or additional cards that force your opponent into the Gyro’d character. Most likely, you need to do both things to fully utilize the card. That also takes up too much space for a plan that may not even fully come to fruition. However, using the card as a “weapon” against blue decks is much easier to manage and the payoff is higher. Being a utility allows for a multiple turn set up where you still have a larger weaponized attack while severely limiting the defensive capability of your target. Tough just doesn’t exist in the face of Gyro. Blue decks have been relying on getting multiple flips on defense since Wave 1 and this card can just stop that strategy dead in its tracks. The difference here is that YOU get to choose where and when you will strike. As a sideboard option, it is much more deadly against tough based decks as well as taking up fewer slots for the same, if not higher, effectiveness.
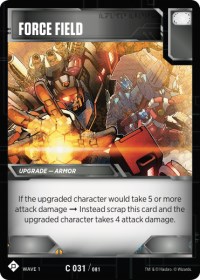
I have already gone on record as saying that I believe Force Field is only playable via Bolster and Ramhorn. Yet the card continues to show up in sideboards. We will make this easy for everyone. Do not play Force Field in your sideboard unless it is rounding out your playset (It should have been included in the main deck to begin with). Also, STOP siding out Bashing Shield in orange mirrors. The only way that most mirrors break down is if one attack misses a kill. Force Field looks tempting when you are trying to force a wasted attack, but its just too risky to raw dog it out there in the hopes of it surviving. If its bashed, you will most likely lose the game right there and then. Once more for those in the back:
Leave Bashing Shield in your deck after sideboarding and stop trying to play “naked” Force Fields! Better yet, STOP putting Force Field in your sideboard!
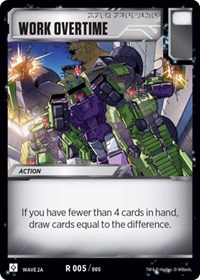
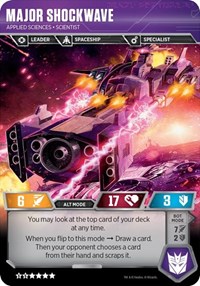
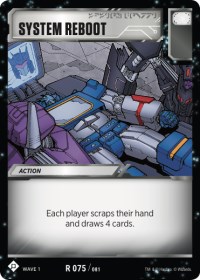
One of these options is decent and the other is close to a joke. Do you know the difference? Currently, all Shockwave variants look to disrupt you by giving you few to zero options for cards to play. Simultaneously they are replacing their cards or adding power to their marque character. Being able to draw four cards seems like a great way to get out of that predicament? Yes and no. Just having these cards against Shockwave will not beat them. Not by a long shot. All these cards do is get you back to card parody, but it does cost your action for the turn leaving you with just a weapon. If that is how you plan to attack the matchup, Work Overtime is the better option to choose. Not only can you save cards for a future turn (which is difficult to do against Shockwave), but you do not refuel your opponent. System Reboot benefits both players, and you are already fighting the uphill battle. Once your hand is basically empty, many of Shockwave’s cards are less impactful or just tread water (UFO). Their hand will also get clogged with “useless” double pipped cards (Handheld Blaster and Security Checkpoint) which they are desperate to pitch for ANY green that comes up. I like to call that an awful lot of air, or cards that have diminishing returns after the initial goal is achieved. Reboot will empty their hand of these useless cards and more than likely give them more resources to work with. Not to mention, their flips and UFOs now do something again. It does not matter if they are holding six or seven cards when most do nothing. System Reboot only works well if your deck can take full advantage of the cards drawn before your opponent is able to. (Bugs and other high-pressure orange decks) Work Overtime grants you the same benefit while not facing any drawback. If you are looking for additional cards to refuel your hand after you max out on Work Overtime, I would look to Backup Plan before System Reboot.
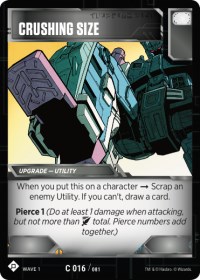
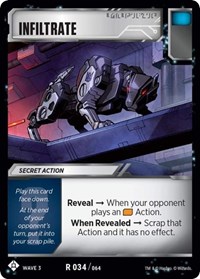
These are what I consider to be hosers. They are in your sideboard because you have a specific card in mind that you want to combat. Metroplex should have Crushing Size to combat Gyros. Having the white pip also helps further their own game plan. What more could the big man want from a sideboard card? It destroys a card that singlehandedly beats them while being on color. Infiltrate is a slightly different monster. Yes, Infiltrate is good against orange decks…But what cards are you trying to protect yourself from? Peace through Tyranny? Reckless Charge on that final attack turn? Press the Advantage BEFORE the ban? It does all these things. However, Infiltrate is only powerful when timed correctly. Crushing size is a reactive answer whereas Infiltrate is a preemptive counter to a possible action. You need to know what action punishes you the most and on which turns it will be the most likely to happen. Being able to properly identify when a game breaking Peace Through Tyranny is the most detrimental is crucial. It will also act to insulate you from any possible chance that your opponent could have of winning action within the last few turns. Its not as cut and dry, but a staple inclusion, nonetheless.
A good friend and a player I highly respect has said on multiple occasions “Pick what you lose to.” What it means is simple: Every single deck within the Transformers TCG has a glaring weakness. You are going to be severely disadvantaged at some point with a certain matchup. What you need to learn is when you can change those odds and when it is not feasible. Having to devote your entire sideboard to address your Insecticon matchup is, frankly, not worth it. Instead strengthen multiple other matches and just hope not to face your nightmare matchup. I would strongly suggest not accepting a bad matchup against any lineup or set of battle cards that you anticipate seeing heavy play. If your deck just cannot out pace Major Shockwave you have a chance of completely dodging him. If your deck has difficulty beating a Peace through Tyranny, you may want to rethink your deck choice.
Next time you construct your sideboard, take these things into consideration. Whether you choose to employ a tactical nuke strategy, or the general good stuff approach completely depends on your style and lineup. Just identify where you are the weakest and fortify. If that’s not an option, you can always roll the dice!
